
はじめに
こんにちは、イノベーションセンターの鈴ヶ嶺です。
第1回、第2回に引き続きAWS Outposts ラックについて紹介していきます。
本記事では、Terraform を用いてOutposts上でオンプレ環境からのみ管理・アクセス可能なPrivate Elastic Kubernetes Service(EKS) を構築する方法を紹介します。
Terraform
Terraformとは、HashCorpが提供するインフラをコード化して自動構築を可能とするInfrastructure as Code(IaC)を実現するためのツールです。OutpostsをTerraformでIaC化するためには、対応した各リソースに outpost_arn を渡すことでOutposts上のリソースが作成されます。
以下はsubnetの一例です。1
resource "aws_subnet" "main" {
  vpc_id            = aws_vpc.main.id
  cidr_block        = "10.0.3.0/24"
  outpost_arn       = "arn:aws:outposts:ap-northeast-1:1234567890:outpost/op-1234567890"
}
outpost_arn - (Optional) The Amazon Resource Name (ARN) of the Outpost.
CDKと比較してTerraformはAWS APIを利用しているのでOutpostsのリソースは比較的対応されていると思われます。今後新しいリソースがOutpostsで利用可能になった場合も対応スピードは早いと予想されます。ただ一方で、CDKのような高レベルなリソース作成をすることが難しいのでリソースやAPIの仕様を把握する必要があります。またリソースの認証情報・状態管理なども考える必要があります。
オンプレ環境上でマネージドk8sサービスを構築するアーキテクチャ
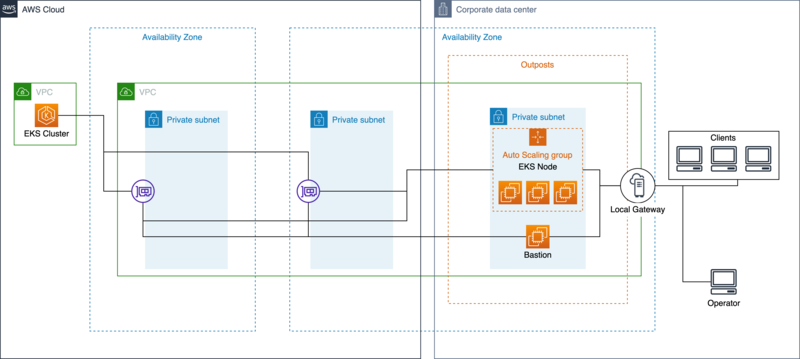
上記のようなオンプレ環境においてもマネージドk8sサービスを利用するアーキテクチャを構築します。Outposts上にAuto Scale Groupを設置してセルフマネージド型ノードとしてそれぞれEC2をEKS Clusterに登録させます。Outpostsとオンプレ環境との通信は全てLocal Gateway経由で接続されます。
この構成の特徴としてEKS ClusterのAPIサーバをPrivateアクセスのみ許可することで、Bastion(踏み台)経由でのみクラスタの操作を可能とするセキュアな点が挙げられます。さらに、アプリケーションもオンプレ環境のみからアクセス可能なため社内にのみ公開する秘匿性の高いシステムを構築できます。
実装
以下のような構成で、それぞれのtfファイルにリソースを定義します。
- main.tf
- Providerや各変数などの全体を記載
- network.tf
- ネットワークに関するものを記載
- eks_cluster.tf
- EKS Clusterに関するものを記載
- eks_node.tf
- EKS Nodeに関するものを記載
- security_group.tf
- Security Groupによる通信の許可に関するものを記載
- bastion.tf
- 踏み台サーバに関するものを記載
- output.tf
- k8sアプリケーションのデプロイ時に使用するものを記載
main.tf
terraform {
  required_providers {
    aws = {
      source  = "hashicorp/aws"
      version = "~> 3.0"
    }
  }
}

provider "aws" {
  region = var.region
}

# Name tag に一部使用する値
variable "name" {
  default = "outposts-eks-sample"
}

# EKS Node のインスタンス
variable "instance_type" {
  default = "m5.large"
}

# EKS Node のdisk(GB)
variable "disk_size" {
  default = 100
}

variable "region" {
  default = "ap-northeast-1"
}

# EKS Node の望ましいノード数
variable "desired_node" {
  default = 3
}

# EKS Node の最低ノード数
variable "min_node" {
  default = 3
}

# EKS Node の最高ノード数
variable "max_node" {
  default = 3
}

# Local Gateway経由からEKSにアクセス可能なオンプレ環境のCIDR
variable "local_cidr_blocks" {
  default = ["192.168.0.0/16"]
}

locals {
  # outpostのARN
  outpost_arn              = "arn:aws:outposts:ap-northeast-1:1234567890:outpost/op-1234567890"

  # Local GatewayのID
  lgw_id                   = "lgw-1234567890"

  # Local GatewayのルートテーブルのID
  lgw_rtb_id               = "lgw-rtb-1234567890"

  # 顧客所有のIPアドレス
  customer_owned_ipv4_pool = "ipv4pool-coip-1234567890"

  # GPUを使用しているかどうか
  gpu = replace(var.instance_type, "g4dn", "!") != var.instance_type
}

# Bastion, EKS Nodeにアクセス可能な鍵
resource "aws_key_pair" "key" {
  key_name   = "${var.name}-key"
  public_key = file("~/.ssh/id_rsa.pub")
}
main.tfにはAWS Providerと各変数、Bastionの鍵を設定します。 OutpostsのARN outpost_arn や Local GatewayのID lgw_id などはここに設定しておきます。
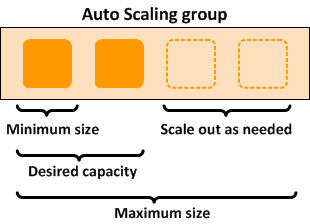
Outposts上でもAuto Scaling groupは仕様可能です。その設定に用いてる max_node, min_node, desired_node の関係は次の画像のようになっております。 2 今回は3ノードの構成で作成します。
network.tf
resource "aws_vpc" "main" {
  cidr_block = "10.0.0.0/16"

  # VPCエンドポイントを有効にするためにdns hostnames, supportを設定
  enable_dns_hostnames = true
  enable_dns_support   = true

  tags = {
    Name = "vpc-${var.name}"
  }
}

# EKS Clusterのsubnet
resource "aws_subnet" "cluster01" {
  vpc_id     = aws_vpc.main.id
  cidr_block = "10.0.1.0/24"

  tags = {
    Name = "subnet-cluster01-${var.name}"
  }
}

# EKS Clusterのsubnet
resource "aws_subnet" "cluster02" {
  vpc_id     = aws_vpc.main.id
  cidr_block = "10.0.2.0/24"

  tags = {
    Name = "subnet-cluster02-${var.name}"
  }
}

# Outpostsのsubnet
resource "aws_subnet" "outposts_subnet01" {
  vpc_id            = aws_vpc.main.id
  cidr_block        = "10.0.3.0/24"
  outpost_arn       = local.outpost_arn
  availability_zone = "ap-northeast-1a"

  tags = {
    Name                                                 = "subnet-outposts-subnet01-${var.name}"
    "kubernetes.io/cluster/${aws_eks_cluster.main.name}" = "owned"
    "kubernetes.io/role/elb"                             = "1"
  }
}


# デフォルトルートをLocal Gatewayに設定
resource "aws_route_table" "local_gateway" {
  vpc_id = aws_vpc.main.id

  route {
    cidr_block       = "0.0.0.0/0"
    local_gateway_id = local.lgw_id
  }

  tags = {
    Name = "local-gateway-route-table-${var.name}"
  }
}

resource "aws_route_table_association" "outposts_subnet01" {
  subnet_id      = aws_subnet.outposts_subnet01.id
  route_table_id = aws_route_table.local_gateway.id
}

data "aws_ec2_local_gateway_route_table" "main" {
  outpost_arn = local.outpost_arn
}

resource "aws_ec2_local_gateway_route_table_vpc_association" "main" {
  local_gateway_route_table_id = data.aws_ec2_local_gateway_route_table.main.id
  vpc_id                       = aws_vpc.main.id
}

# EKS Nodeに設定するEIPのPool
resource "aws_eip" "main" {
  count                    = var.max_node
  customer_owned_ipv4_pool = local.customer_owned_ipv4_pool

  tags = {
    Name = "eip-node-${count.index}"
  }

}

# Bastion(踏み台)のEIP
resource "aws_eip" "bastion" {
  customer_owned_ipv4_pool = local.customer_owned_ipv4_pool
  tags = {
    Name = "eip-bastion-${var.name}"
  }
}

# 初期起動時にEKS Node自身がEIPを自ら設定するためのEC2エンドポイントを設定
resource "aws_vpc_endpoint" "ec2" {
  vpc_id            = aws_vpc.main.id
  service_name      = "com.amazonaws.${var.region}.ec2"
  vpc_endpoint_type = "Interface"

  subnet_ids = [aws_subnet.outposts_subnet01.id]
  security_group_ids = [
    aws_security_group.vpc_endpoint_ec2.id,
  ]

  private_dns_enabled = true
}
network.tfにはネットワークに関するリソースを定義します。
ネットワーク構成として、Public AWS上にsubnetを2つ、Outposts上にsubnetを1つ作成します。OutpostsのsubnetにEKSのWorker Nodeが設置されます。基本的にOutpostsのsubnetはデフォルトルートをLocal Gatewayに設定することでインターネットなどのアクセスはオンプレ環境経由で接続されるようにします。これにより社内のネットワークポリシーの適用や監視などを可能とします。また、Local Gatewayに接続するためには顧客所有のIPアドレスcustomer owned IP address(CoIP)をアタッチする必要があるためEKS Node、Bastion用のCoIPのElastic IP アドレス(EIP)を作成しておきます。
eks_cluster.tf
# EKS Cluster
resource "aws_eks_cluster" "main" {
  name     = var.name
  role_arn = aws_iam_role.cluster_role.arn

  vpc_config {
    security_group_ids      = [aws_security_group.cluster.id]
    subnet_ids              = [aws_subnet.cluster01.id, aws_subnet.cluster02.id]

    # Private Accessのみに設定してBastion経由でのみ操作する
    endpoint_public_access  = false
    endpoint_private_access = true
  }

  depends_on = [
    aws_iam_role_policy_attachment.eks_cluster_policy,
    aws_iam_role_policy_attachment.eks_service_policy,
    aws_iam_role_policy_attachment.eks_vpc_resource-controller,
  ]
}

resource "aws_iam_role" "cluster_role" {
  name = "eks-cluster-role-${var.name}"

  assume_role_policy = <<EOF
{
  "Version": "2012-10-17",
  "Statement": [
    {
      "Effect": "Allow",
      "Principal": {
        "Service": "eks.amazonaws.com"
      },
      "Action": "sts:AssumeRole"
    }
  ]
}
EOF
}

resource "aws_iam_role_policy_attachment" "eks_cluster_policy" {
  policy_arn = "arn:aws:iam::aws:policy/AmazonEKSClusterPolicy"
  role       = aws_iam_role.cluster_role.name
}

resource "aws_iam_role_policy_attachment" "eks_service_policy" {
  policy_arn = "arn:aws:iam::aws:policy/AmazonEKSServicePolicy"
  role       = aws_iam_role.cluster_role.name
}

resource "aws_iam_role_policy_attachment" "eks_vpc_resource-controller" {
  policy_arn = "arn:aws:iam::aws:policy/AmazonEKSVPCResourceController"
  role       = aws_iam_role.cluster_role.name
}

# ALBを使用するためのIAM Policy
resource "aws_iam_policy" "aws_load_balancer_controller" {
  name = "alb-policy-${var.name}"

  # from https://raw.githubusercontent.com/kubernetes-sigs/aws-load-balancer-controller/v2.2.1/docs/install/iam_policy.json
  policy = <<EOF
{
    "Version": "2012-10-17",
    "Statement": [
        {
            "Effect": "Allow",
            "Action": [
                "iam:CreateServiceLinkedRole",
                "ec2:DescribeAccountAttributes",
                "ec2:DescribeAddresses",
                "ec2:DescribeAvailabilityZones",
                "ec2:DescribeInternetGateways",
                "ec2:DescribeVpcs",
                "ec2:DescribeSubnets",
                "ec2:DescribeSecurityGroups",
                "ec2:DescribeInstances",
                "ec2:DescribeNetworkInterfaces",
                "ec2:DescribeTags",
                "ec2:GetCoipPoolUsage",
                "ec2:DescribeCoipPools",
                "elasticloadbalancing:DescribeLoadBalancers",
                "elasticloadbalancing:DescribeLoadBalancerAttributes",
                "elasticloadbalancing:DescribeListeners",
                "elasticloadbalancing:DescribeListenerCertificates",
                "elasticloadbalancing:DescribeSSLPolicies",
                "elasticloadbalancing:DescribeRules",
                "elasticloadbalancing:DescribeTargetGroups",
                "elasticloadbalancing:DescribeTargetGroupAttributes",
                "elasticloadbalancing:DescribeTargetHealth",
                "elasticloadbalancing:DescribeTags"
            ],
            "Resource": "*"
        },
        {
            "Effect": "Allow",
            "Action": [
                "cognito-idp:DescribeUserPoolClient",
                "acm:ListCertificates",
                "acm:DescribeCertificate",
                "iam:ListServerCertificates",
                "iam:GetServerCertificate",
                "waf-regional:GetWebACL",
                "waf-regional:GetWebACLForResource",
                "waf-regional:AssociateWebACL",
                "waf-regional:DisassociateWebACL",
                "wafv2:GetWebACL",
                "wafv2:GetWebACLForResource",
                "wafv2:AssociateWebACL",
                "wafv2:DisassociateWebACL",
                "shield:GetSubscriptionState",
                "shield:DescribeProtection",
                "shield:CreateProtection",
                "shield:DeleteProtection"
            ],
            "Resource": "*"
        },
        {
            "Effect": "Allow",
            "Action": [
                "ec2:AuthorizeSecurityGroupIngress",
                "ec2:RevokeSecurityGroupIngress"
            ],
            "Resource": "*"
        },
        {
            "Effect": "Allow",
            "Action": [
                "ec2:CreateSecurityGroup"
            ],
            "Resource": "*"
        },
        {
            "Effect": "Allow",
            "Action": [
                "ec2:CreateTags"
            ],
            "Resource": "arn:aws:ec2:*:*:security-group/*",
            "Condition": {
                "StringEquals": {
                    "ec2:CreateAction": "CreateSecurityGroup"
                },
                "Null": {
                    "aws:RequestTag/elbv2.k8s.aws/cluster": "false"
                }
            }
        },
        {
            "Effect": "Allow",
            "Action": [
                "ec2:CreateTags",
                "ec2:DeleteTags"
            ],
            "Resource": "arn:aws:ec2:*:*:security-group/*",
            "Condition": {
                "Null": {
                    "aws:RequestTag/elbv2.k8s.aws/cluster": "true",
                    "aws:ResourceTag/elbv2.k8s.aws/cluster": "false"
                }
            }
        },
        {
            "Effect": "Allow",
            "Action": [
                "ec2:AuthorizeSecurityGroupIngress",
                "ec2:RevokeSecurityGroupIngress",
                "ec2:DeleteSecurityGroup"
            ],
            "Resource": "*",
            "Condition": {
                "Null": {
                    "aws:ResourceTag/elbv2.k8s.aws/cluster": "false"
                }
            }
        },
        {
            "Effect": "Allow",
            "Action": [
                "elasticloadbalancing:CreateLoadBalancer",
                "elasticloadbalancing:CreateTargetGroup"
            ],
            "Resource": "*",
            "Condition": {
                "Null": {
                    "aws:RequestTag/elbv2.k8s.aws/cluster": "false"
                }
            }
        },
        {
            "Effect": "Allow",
            "Action": [
                "elasticloadbalancing:CreateListener",
                "elasticloadbalancing:DeleteListener",
                "elasticloadbalancing:CreateRule",
                "elasticloadbalancing:DeleteRule"
            ],
            "Resource": "*"
        },
        {
            "Effect": "Allow",
            "Action": [
                "elasticloadbalancing:AddTags",
                "elasticloadbalancing:RemoveTags"
            ],
            "Resource": [
                "arn:aws:elasticloadbalancing:*:*:targetgroup/*/*",
                "arn:aws:elasticloadbalancing:*:*:loadbalancer/net/*/*",
                "arn:aws:elasticloadbalancing:*:*:loadbalancer/app/*/*"
            ],
            "Condition": {
                "Null": {
                    "aws:RequestTag/elbv2.k8s.aws/cluster": "true",
                    "aws:ResourceTag/elbv2.k8s.aws/cluster": "false"
                }
            }
        },
        {
            "Effect": "Allow",
            "Action": [
                "elasticloadbalancing:AddTags",
                "elasticloadbalancing:RemoveTags"
            ],
            "Resource": [
                "arn:aws:elasticloadbalancing:*:*:listener/net/*/*/*",
                "arn:aws:elasticloadbalancing:*:*:listener/app/*/*/*",
                "arn:aws:elasticloadbalancing:*:*:listener-rule/net/*/*/*",
                "arn:aws:elasticloadbalancing:*:*:listener-rule/app/*/*/*"
            ]
        },
        {
            "Effect": "Allow",
            "Action": [
                "elasticloadbalancing:ModifyLoadBalancerAttributes",
                "elasticloadbalancing:SetIpAddressType",
                "elasticloadbalancing:SetSecurityGroups",
                "elasticloadbalancing:SetSubnets",
                "elasticloadbalancing:DeleteLoadBalancer",
                "elasticloadbalancing:ModifyTargetGroup",
                "elasticloadbalancing:ModifyTargetGroupAttributes",
                "elasticloadbalancing:DeleteTargetGroup"
            ],
            "Resource": "*",
            "Condition": {
                "Null": {
                    "aws:ResourceTag/elbv2.k8s.aws/cluster": "false"
                }
            }
        },
        {
            "Effect": "Allow",
            "Action": [
                "elasticloadbalancing:RegisterTargets",
                "elasticloadbalancing:DeregisterTargets"
            ],
            "Resource": "arn:aws:elasticloadbalancing:*:*:targetgroup/*/*"
        },
        {
            "Effect": "Allow",
            "Action": [
                "elasticloadbalancing:SetWebAcl",
                "elasticloadbalancing:ModifyListener",
                "elasticloadbalancing:AddListenerCertificates",
                "elasticloadbalancing:RemoveListenerCertificates",
                "elasticloadbalancing:ModifyRule"
            ],
            "Resource": "*"
        }
    ]
}
  EOF
}
eks_cluster.tfでは、EKS Clusterに関するリソースを定義しています。
ここでは、EKS ClusterのPrivate Accessを設定することで内部からのみAPIサーバにアクセス可能となります。この設定をすることでよりセキュアなk8s環境が実現できます。運用の際にはBastion経由でkubectl, helmなどの操作をします。
eks_node.tf
locals {
  # 初期起動時にEKS Node自身がEIPを自ら設定してオンプレ環境に対して通信する
  node_user_data = <<EOF
  #!/bin/bash
  set -o xtrace

  export AWS_DEFAULT_REGION=${var.region}

  instance_id=$(curl 169.254.169.254/latest/meta-data/instance-id/)

  # EIP Check function
  function check_eip () {
    RES=`aws ec2 describe-addresses --filters Name=allocation-id,Values=$1 | jq .Addresses[0].InstanceId`
    if [ "$RES" = "null" ]; then
        return 0
    fi
    return 1
  }

  eips="${join(" ", aws_eip.main.*.id)}"

  # EIP Attach
  for eip in $eips; do
    check_eip $eip
    if [ $? = 0 ]; then
      aws ec2 associate-address --no-allow-reassociation --instance-id $instance_id --allocation-id $eip
      if [ $? = 0 ]; then
        break
      fi
    fi
  done

  # EKS Node Bootstrap
  /etc/eks/bootstrap.sh ${aws_eks_cluster.main.name}
  EOF

  node_role_name = "node_role_${var.name}"
}

data "aws_ssm_parameter" "eks_cpu_ami" {
  name = "/aws/service/eks/optimized-ami/1.21/amazon-linux-2/recommended/image_id"
}

data "aws_ssm_parameter" "eks_gpu_ami" {
  name = "/aws/service/eks/optimized-ami/1.21/amazon-linux-2-gpu/recommended/image_id"
}

resource "aws_launch_template" "node_template" {
  name_prefix = "eks_sample_node_group_template"

  image_id = local.gpu == true ? data.aws_ssm_parameter.eks_gpu_ami.value : data.aws_ssm_parameter.eks_cpu_ami.value

  instance_type          = var.instance_type
  vpc_security_group_ids = [aws_security_group.node.id]
  key_name               = aws_key_pair.key.id


  block_device_mappings {
    device_name = "/dev/xvda"

    ebs {
      volume_size = var.disk_size
    }
  }

  iam_instance_profile {
    name = aws_iam_instance_profile.instance_role.name
  }

  tag_specifications {
    resource_type = "instance"

    tags = {
      Name = "eks-sample-node"
    }
  }


  user_data = base64encode(local.node_user_data)
}

# EKS NodeのAutoScaleGroup
resource "aws_autoscaling_group" "node_group" {
  vpc_zone_identifier       = [aws_subnet.outposts_subnet01.id]
  desired_capacity          = var.desired_node
  max_size                  = var.max_node
  min_size                  = var.min_node
  health_check_type         = "EC2"
  wait_for_capacity_timeout = "120m"

  launch_template {
    id      = aws_launch_template.node_template.id
    version = "$Latest"
  }

  tag {
    key                 = "kubernetes.io/cluster/${aws_eks_cluster.main.name}"
    value               = "owned"
    propagate_at_launch = true
  }
}

resource "aws_iam_role" "node_group_role" {
  name = "node-group-role-${var.name}"

  assume_role_policy = <<EOF
{
  "Version": "2012-10-17",
  "Statement": [
    {
      "Effect": "Allow",
      "Principal": {
        "Service": "ec2.amazonaws.com"
      },
      "Action": "sts:AssumeRole"
    }
  ]
}
EOF
}

resource "aws_iam_role_policy_attachment" "eks-worker-node-policy" {
  policy_arn = "arn:aws:iam::aws:policy/AmazonEKSWorkerNodePolicy"
  role       = aws_iam_role.node_group_role.name
}

resource "aws_iam_role_policy_attachment" "eks-cni-policy" {
  policy_arn = "arn:aws:iam::aws:policy/AmazonEKS_CNI_Policy"
  role       = aws_iam_role.node_group_role.name
}

resource "aws_iam_role_policy_attachment" "eks-container-registry-read-only" {
  policy_arn = "arn:aws:iam::aws:policy/AmazonEC2ContainerRegistryReadOnly"
  role       = aws_iam_role.node_group_role.name
}

resource "aws_iam_instance_profile" "instance_role" {
  name = local.node_role_name
  role = aws_iam_role.node_group_role.name
}

# EKS NodeにEIPをAttachするためのIAM Policy
resource "aws_iam_policy" "eip_attach_policy" {
  name = "eip-attach-policy-${var.name}"

  policy = <<EOF
{
    "Version": "2012-10-17",
    "Statement": [
        {
            "Effect": "Allow",
            "Action": [
                "ec2:DescribeAddresses",
                "ec2:AssociateAddress"
            ],
            "Resource": "*"
        }
    ]
}
  EOF
}

resource "aws_iam_role_policy_attachment" "eip_attach_policy" {
  role       = aws_iam_role.node_group_role.name
  policy_arn = aws_iam_policy.eip_attach_policy.arn
}

# セルフマネージド型ノードがEKSに登録されるための設定、BastionでのAPIサーバに対するkubectl操作の許可設定
resource "local_file" "aws_auth" {
  content  = <<EOF
apiVersion: v1
kind: ConfigMap
metadata:
  name: aws-auth
  namespace: kube-system
data:
  mapRoles: |
    - rolearn: ${aws_iam_role.node_group_role.arn}
      username: system:node:{{EC2PrivateDNSName}}
      groups:
        - system:bootstrappers
        - system:nodes
    - rolearn: ${aws_iam_role.bastion.arn}
      username: bastionrole
      groups:
        - system:masters
EOF
  filename = "_aws-auth.yaml"
}
eks_node.tfでは、EKS Nodeに関するリソースを定義しています。
Outposts上ではAuto Scale Groupの利用が可能なためその設定を定義しています。ここでの特徴はAuto Scale Groupの各ノードに対して user_data の中の処理でCoIPを設定しているところです。Auto Scale Groupには自動でEIPを設定が現状できないため、この設定によりLocal Gateway経由でインターネットやオンプレ環境と通信することが可能となります。
また、aws_auth ではBastionのRoleがAPIサーバにアクセスするための設定ファイルを作成しています。
security_group.tf
resource "aws_security_group" "cluster" {
  vpc_id = aws_vpc.main.id
  name   = "eks-cluster-security-group-${var.name}"

  tags = {
    Name = "eks-cluster-security-group-${var.name}"
  }

  ingress {
    from_port       = 1025
    to_port         = 65535
    protocol        = "tcp"
    security_groups = [aws_security_group.node.id]
  }

  ingress {
    from_port       = 443
    to_port         = 443
    protocol        = "tcp"
    security_groups = [aws_security_group.node.id, aws_security_group.bastion.id]
  }

  egress {
    from_port   = 0
    to_port     = 0
    protocol    = "-1"
    cidr_blocks = ["0.0.0.0/0"]
  }
}


resource "aws_security_group" "node" {
  vpc_id = aws_vpc.main.id
  name   = "eks-node-sg-${var.name}"

  tags = {
    Name = "eks-node-sg-${var.name}"
  }

  egress {
    from_port   = 0
    to_port     = 0
    protocol    = "-1"
    cidr_blocks = ["0.0.0.0/0"]
  }
}

resource "aws_security_group_rule" "node_ingress_443" {
  security_group_id        = aws_security_group.node.id
  type                     = "ingress"
  from_port                = 443
  to_port                  = 443
  protocol                 = "tcp"
  source_security_group_id = aws_security_group.cluster.id
}

resource "aws_security_group_rule" "node_ingress_1025_65535" {
  security_group_id        = aws_security_group.node.id
  type                     = "ingress"
  from_port                = 1025
  to_port                  = 65535
  protocol                 = "tcp"
  source_security_group_id = aws_security_group.cluster.id
}

resource "aws_security_group_rule" "node_ingress_localgateway" {
  security_group_id = aws_security_group.node.id
  type              = "ingress"
  from_port         = 0
  to_port           = 0
  protocol          = "all"
  cidr_blocks       = var.local_cidr_blocks
}

resource "aws_security_group_rule" "node_ingress_self" {
  security_group_id = aws_security_group.node.id
  type              = "ingress"
  from_port         = 0
  to_port           = 0
  protocol          = "all"
  self              = true
}


resource "aws_security_group" "vpc_endpoint_ec2" {
  vpc_id = aws_vpc.main.id
  name   = "vpc-endpoint-ec2-sg-${var.name}"

  tags = {
    Name = "vpc-endpoint-ec2-sg-${var.name}"
  }

  ingress {
    from_port       = 0
    to_port         = 0
    protocol        = "all"
    security_groups = [aws_security_group.node.id]
  }

  egress {
    from_port   = 0
    to_port     = 0
    protocol    = "-1"
    cidr_blocks = ["0.0.0.0/0"]
  }
}

resource "aws_security_group" "bastion" {
  vpc_id = aws_vpc.main.id
  name   = "bastion-sg-${var.name}"

  tags = {
    Name = "bastion-sg-${var.name}"
  }

  # オンプレ環境からのみアクセス可能な設定にする
  ingress {
    from_port   = 22
    to_port     = 22
    protocol    = "tcp"
    cidr_blocks = var.local_cidr_blocks
  }

  egress {
    from_port   = 0
    to_port     = 0
    protocol    = "-1"
    cidr_blocks = ["0.0.0.0/0"]
  }
}
security_group.tfにはSecurity Groupに関するリソースを定義します。
こちらでは、EKSやオンプレ環境とのSecurity Groupについて設定されています。 local_cidr_blocks については適宜それぞれのオンプレ環境に適した設定が必要となります。EKSについての詳細は次の公式ドキュメントを参照してください。
bastion.tf
locals {
  # APIサーバを操作するためのkubectl, helmなどの各種ツールをインストールする
  bastion_user_data = <<EOF
  #!/bin/bash
  set -o xtrace

  # install kubectl
  curl --retry 180 --retry-delay 1 -LO "https://storage.googleapis.com/kubernetes-release/release/$(curl -s https://storage.googleapis.com/kubernetes-release/release/stable.txt)/bin/linux/amd64/kubectl"
  chmod +x ./kubectl
  sudo mv ./kubectl /usr/local/bin/kubectl

  # install helm
  curl -sSL https://raw.githubusercontent.com/helm/helm/master/scripts/get-helm-3 | bash
  EOF
}

data "aws_ssm_parameter" "amzn2_ami" {
  name = "/aws/service/ami-amazon-linux-latest/amzn2-ami-hvm-x86_64-gp2"
}

data "aws_iam_policy_document" "assume_role" {
  statement {
    actions = ["sts:AssumeRole"]

    principals {
      type        = "Service"
      identifiers = ["ec2.amazonaws.com"]
    }
  }
}

resource "aws_iam_role" "bastion" {
  name = "bastion-role-${var.name}"

  assume_role_policy = data.aws_iam_policy_document.assume_role.json

}

# APIサーバ認証のためのIAM Policy
resource "aws_iam_policy" "bastion" {
  name = "bastion-policy-${var.name}"

  policy = <<EOF
{
    "Version": "2012-10-17",
    "Statement": [
        {
            "Effect": "Allow",
            "Action": [
                "eks:UpdateClusterConfig",
                "eks:DescribeUpdate",
                "eks:DescribeCluster"
            ],
            "Resource": "${aws_eks_cluster.main.arn}"
        },
        {
            "Effect": "Allow",
            "Action": [
                "eks:ListClusters"
            ],
            "Resource": "*"
        }
    ]
}
  EOF
}

resource "aws_iam_role_policy_attachment" "bastion" {
  role       = aws_iam_role.bastion.name
  policy_arn = aws_iam_policy.bastion.arn
}


resource "aws_iam_instance_profile" "bastion" {
  role = aws_iam_role.bastion.name
}

resource "aws_instance" "bastion" {
  ami                    = data.aws_ssm_parameter.amzn2_ami.value
  subnet_id              = aws_subnet.outposts_subnet01.id
  instance_type          = var.bastion_instance_type
  key_name               = aws_key_pair.key.key_name
  vpc_security_group_ids = [aws_security_group.bastion.id]
  iam_instance_profile   = aws_iam_instance_profile.bastion.name
  user_data              = local.bastion_user_data

  tags = {
    Name = "bastion-instance-${var.name}"
  }
}

resource "aws_eip_association" "bastion" {
  instance_id   = aws_instance.bastion.id
  allocation_id = aws_eip.bastion.id
}
bastion.tfにはBastion(踏み台)に関するリソースを定義します。
こちらでは、BastionにEKSのAPIサーバを操作可能とするためのIAM Roleを設定していることがわかると思います。また通信もCoIPを設定してオンプレ環境からのみ接続できるように設定します。
output.tf
output "cluster" {
  value = aws_eks_cluster.main.name
}

output "alb_arn" {
  value = aws_iam_policy.aws_load_balancer_controller.arn
}

output "region" {
  value = var.region
}

output "ip_pool" {
  value = local.customer_owned_ipv4_pool
}

output "vpc_cidr" {
  value = aws_vpc.main.cidr_block
}

output "bastion_ip" {
  value = aws_eip.bastion.customer_owned_ip
}
output.tfにはk8sアプリケーションのデプロイに使用する値を定義します。
Terraform Apply
上記のtfファイルを次のようにapplyすることで一連のリソースの自動構築が可能です。
terraform init
terraform plan # dry run
terraform apply
Setup EKS
初期には、APIサーバにはEKSクラスタ作成者のみがアクセス可能なためsshuttleというsshでBastion経由の通信を可能とするツールを用います。aws-authをapplyした後はBastion上での操作が可能となります。まず初めにhelmを用いてEKS上でALB利用するためのOIDCやServiceAccountなどの設定をして、サンプルアプリケーションgame2048をデプロイしてみます。
事前に使用する sshuttle, kubectl, helm などのツールをインストールします。
動作確認環境: Apple M1 Max MacBookPro18,4 macOS 12.2.1 Darwin 21.3.0
brew install sshuttle
brew install kubectl
brew install helm
brew tap weaveworks/tap
brew install weaveworks/tap/eksctl
CLUSTER="`terraform output -raw cluster`"
ALB_ARN="`terraform output -raw alb_arn`"
REGION="`terraform output -raw region`"
IP_POOL="`terraform output -raw ip_pool`"
BASTION_IP="`terraform output -raw bastion_ip`"
VPC_CIDR="`terraform output -raw vpc_cidr`"

sshuttle -r ec2-user@$BASTION_IP $VPC_CIDR &
PID=$!
aws eks --region $REGION update-kubeconfig --name $CLUSTER
kubectl apply -f _aws-auth.yaml

# oidc
eksctl utils associate-iam-oidc-provider \
    --region=ap-northeast-1 \
    --cluster=$CLUSTER \
    --region=$REGION \
    --approve

# attach policy
eksctl create iamserviceaccount \
    --cluster=$CLUSTER \
    --namespace=kube-system \
    --name=aws-load-balancer-controller \
    --attach-policy-arn=$ALB_ARN \
    --override-existing-serviceaccounts \
    --approve

# ssh bastion
ssh ec2-user@$BASTION_IP

# ALB
helm install aws-load-balancer-controller eks/aws-load-balancer-controller \
  -n kube-system \
  --set clusterName=$CLUSTER \
  --set serviceAccount.create=false \
  --set image.repository=602401143452.dkr.ecr.ap-northeast-1.amazonaws.com/amazon/aws-load-balancer-controller \
  --set serviceAccount.name=aws-load-balancer-controller

# ALB Application game2048
curl -s https://raw.githubusercontent.com/kubernetes-sigs/aws-load-balancer-controller/v2.3.1/docs/examples/2048/2048_full.yaml | \
    sed "51s|.*|    alb.ingress.kubernetes.io/customer-owned-ipv4-pool: $IP_POOL|"  > _2048_full.yaml
kubectl apply -f _2048_full.yaml

kill -9 $PID
ingressの設定の中に alb.ingress.kubernetes.io/customer-owned-ipv4-pool 3 を設定することでオンプレからアクセス可能なALBを作成することが可能となります。
上記のようにgame-2048をdeployすることで以下のようにingressが立ち上がります。表示されたURIにオンプレ環境からアクセスすることでサンプルのアプリケーションが表示されます。
kubectl get ingress -n game-2048
NAME           CLASS    HOSTS   ADDRESS                                                                        PORTS   AGE
ingress-2048   <none>   *       k8s-game2048-ingress2-xxxxxxxxx-1234567890.ap-northeast-1.elb.amazonaws.com   80      4d10h

以上のようにサンプルアプリケーションを実行できました。
まとめ
本記事では、Terraformを用いてOutposts上でオンプレ環境からのみ管理・アクセス可能なPrivate EKSを構築する方法を紹介しました。
開発面では、オンプレ環境でもIaCを用いてマネージドk8sを利用することが大きなメリットかと思います。利用面でもセキュアな可用性の高いアプリケーションを構築することが可能となるため非常に有用であると思います。